How to Backup iTunes
Backing up your iTunes library is extremely important in the event that files become accidentally deleted or if your computer crashes. Because you truly never know when a hardware failure can affect your desktop or laptop computer, having a backup of files that are important to you is crucial.
Today we continue with our “How to backup” series. If you missed an episode you can find all of our backup how to’s here. Because you may have spent hours organizing your iTunes library with music, videos, pictures and games, loosing all of this content can be extremely stressful.
By choosing to backup your iTunes before anything goes wrong, you’ll have an additional copy of all of your content elsewhere for your convenience. Now that you’ve made the decision to backup your iTunes, it’s time to learn exactly how that can be done with very little struggle.
Consolidating Your Library
The first thing that you will want to do before backing up your iTunes is to consolidate your library. Consolidating your library simply means that you are ensuring that all files in your library are stored within the same folder.

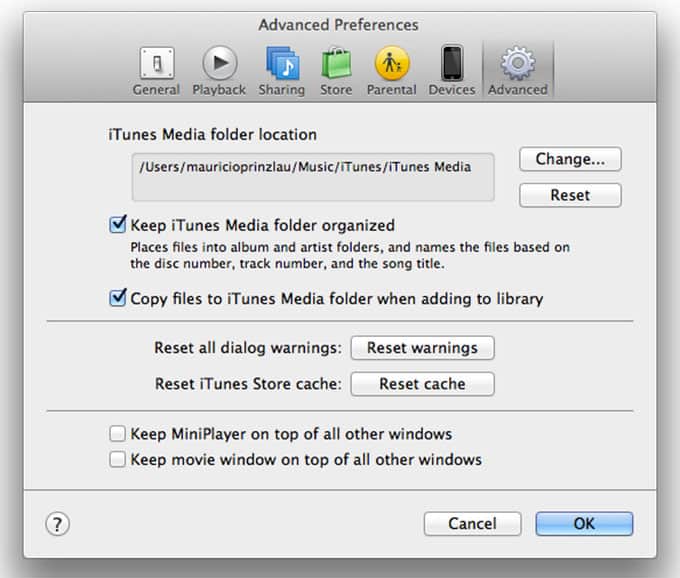
This is especially important when you’re backing up your library because if some selected songs are stored elsewhere, they may get left behind during the backup process. To consolidate on Windows – click on Edit – click on Preferences. To consolidating on Mac – click on iTunes – click on Preferences
You will now want to click on the Advanced tab to bring up additional setting and preferences that can be viewed and changed. Be sure to click on the check box next to, “Copy files to iTunes Media folder when adding to library” and click OK to finish consolidating. All of your iTunes library files will now be saved to the iTunes Media folder for backup.
Organizing Your Files & Library
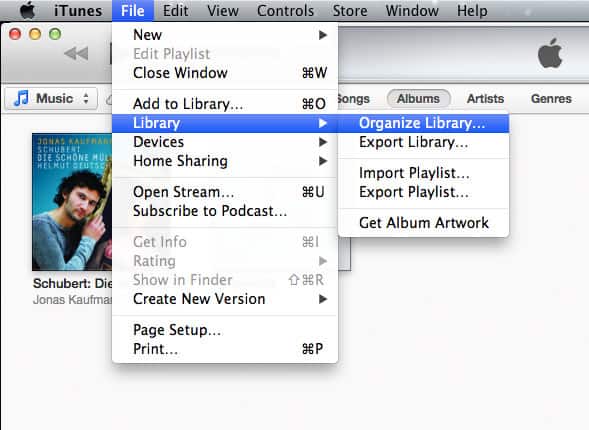
Before backing up iTunes, you may also choose to organize all of your files within the library. This makes it easy to find everything and for files to be in the correct order rather than all over the place. iTunes offers a helpful built-in function that makes organizing simple.
Organizing on Windows or Mac – Click on File – Click on Library – Click on Organize Library

A window will then pop up with two different check boxes that say Consolidate files and Reorganize files in the folder “iTunes Music.” Check out both of these boxes before clicking OK to consolidate and organize all of the files within your library easily and efficiently.
Backing Up iTunes to External HD or NAS
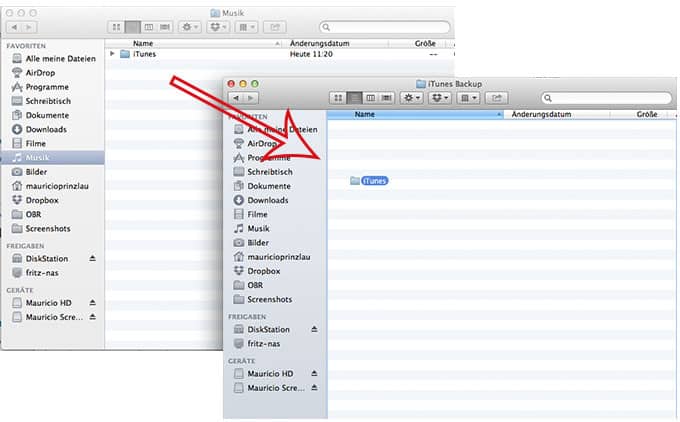
The easiest way to backup your iTunes library is by using an external hard drive. This can easily be accomplished by first exiting out of iTunes and by opening up your external hard drive on the computer. Next, open up your iTunes library on the desktop.

After locating your iTunes library which is commonly found in the My Music folder on Windows or Music folder on Mac, simply drag the folder into your external hard drive folder. Now the backup process will begin and can vary in time depending on the number of files that you have in your library. Wait for the process to complete for exiting.
Conclusion
If you do not have an external hard drive to backup your iTunes library on, you may choose to take advantage of cloud storage for all of your backup needs. SugarSync allows you to secure your music, photos and other iTunes files securely on the Internet.
You can also sync and share files with friends and family if desired. To take advantage of this storage option, simply sign up for an account, locate your iTunes library folder and upload it to your account for access whenever you need it. You can even stream your music directly on your mobile phone with downloading it. Now that’s what I call a backup!


 Mauricio is the ultimate shot-caller at CommQueR.com. Having founded the site on a cold and rainy summer’s night in Hamburg back in 2013, he’s been working hard on making it the most authoritative resource for reviews on the internet. Currently his main concerns are industry relations and affiliate management, where his BA in Business Communication Management comes in very handy. Reach him at mauricio [at] commquer.com, though he’s a busy man so he’ll ask you to get straight to the point.